How to track and pick inventory with Bins in Shopify
Organize your warehouse and improve your order fulfillment process using Shopify's new Bin Locations.
Pick Process for Profits
One of the biggest challenges Shopify stores face is making sure staff can quickly locate and pick the right products to fulfill customer orders. If you have a large stack of products in a warehouse, this becomes an even bigger problem. Without a clear system in Shopify, your team members spend extra time searching through shelves to find the right products. This will obviously slow down fulfillment and increase the chance of mistakes. This process can be streamlined by adopting a simple process in Shopify that includes adding bin labels to products and using pick lists to fulfill orders.
To solve your warehouse woes, you’ll want to consider assigning “bin locations” to your inventory and then providing your staff a “pick list” for every order. This creates a system for labeling products in Shopify and picking items in the warehouse. Formalizing this process turns stock picking into a predictable, organized workflow that helps increase fulfillment. But how do you accomplish this in Shopify?
Shopify has recently introduced a new “bin name” field in their inventory CSV. This gives you a simple way to upload, track, and manage products directly in Shopify. We’ll review this new field and discuss other options for optimizing your fulfillment and pick process.
Get Organized to Help Fulfillment
The key to efficient order fulfillment is organization. If products don’t have a designated warehouse location, your staff end up wasting time searching through shelves to find what they need. This leads to slower packing times and more frequent mistakes. By giving each product a clear bin location, you create a system to guide your warehouse staff directly to the right spot to fulfill that order.
A “bin” refers to the specific location in your warehouse where a product is stored. It doesn’t always mean a literal plastic bin or container, it can be any defined spot on your shelves or racks. For example, a bin could represent a shelf number, a rack, or even a section of your warehouse floor. The goal is for every Shopify variant to have a unique location in your warehouse. When it comes time to fulfill an order, your staff will know exactly where to fetch items based upon the pick list provided by Shopify.
Once you have bins assigned to your products, the next step is putting that information into a pick list for each order. A pick list is a document, either printed or digital, that tells your warehouse staff exactly what items need to be collected to fulfill an order. It lists the products, quantities and bin locations for order. This makes the pick list a step-by-step guide for your team, showing them exactly where to go in the warehouse and what to grab. A pick list can be printed for every order through the Shopify admin. This will speed up the fulfillment process and prevent random searching for products.
Combining bins with pick lists creates a reliable system for running your warehouse because it connects the digital organization in Shopify with the physical layout of your shelves. Using a pick list eliminates guesswork from the fulfillment process. A new hire who may not yet know the layout of your warehouse can still perform just as effectively as an experienced employee, because the pick list directs them straight to the correct bins.
Managing Bins in Shopify
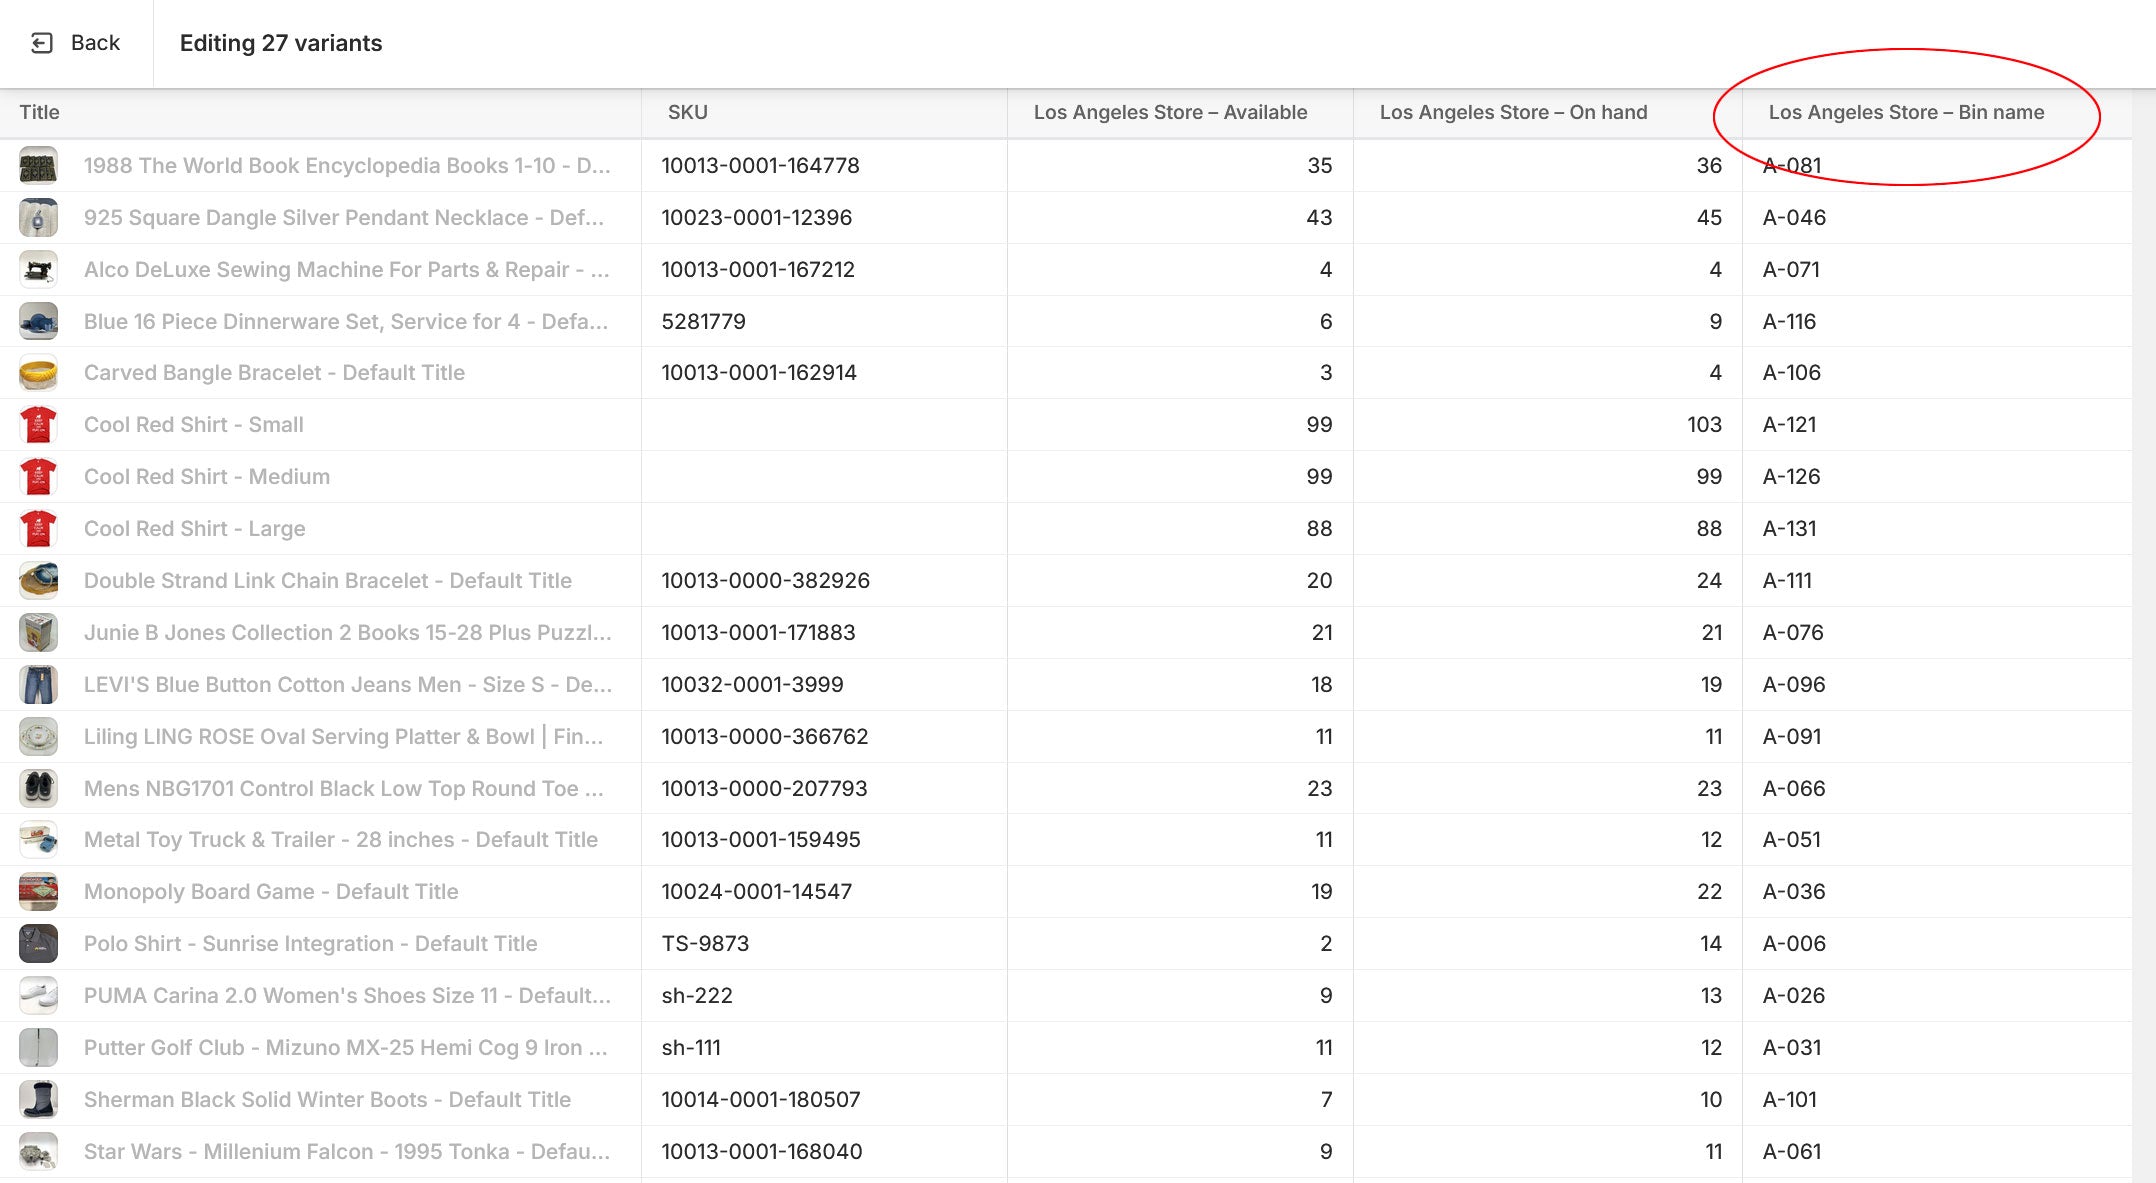
Shopify now features a new “Bin name” field for each variant at every location. The bin names appear on Pick lists and on the Inventory Index page. To use this new feature, you will need to manually add the data via a CSV import or Bulk editor. Let’s walk through this process and set up bins in Shopify.
(You can see the new “Bin name” column on the Inventory page image below)
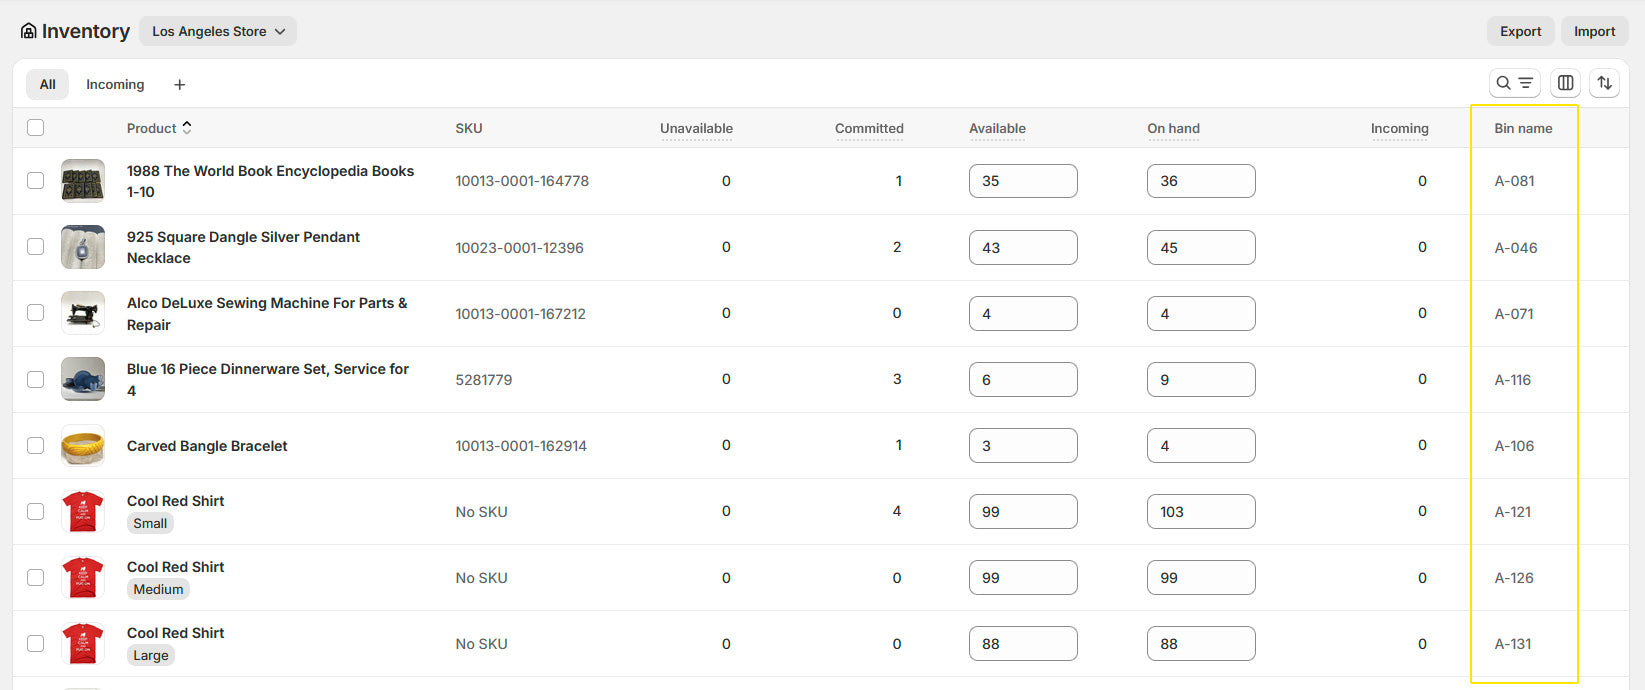
The new bin feature helps you set up and manage the picking process inside your Shopify Admin. You'll assign a "bin value" to each variant using this new field in Shopify. This value should represent the physical location (of that item) in your warehouse. Each product variant can be assigned only one bin value per location. Your specific values will be custom to your warehouse labeling convention. For example, your shelves may be numbered using letters and numbers like “A-01”, “A-02” These are the values you would enter for each product in Shopify. The bin value should match the warehouse location value. Your team will match these values during the picking process. It’s good practice to Consider using a consistent bin naming format for proper sorting in picklists, such as A-001 instead of A-1.
You can access the new “bin name” fields in the inventory CSV. The CSV is available in your Shopify Products or Inventory page. You can import/export and track the bin values from the CSV file. Keep in mind this is a manual process of file manipulation. If you already have a large catalog, you probably want to first export your inventory CSV and then add the bin names in the new column. Once you do that, re-import the CSV file. This allows you to bulk update all your bin locations without having to go through products one by one in the admin. If you need more help, check out Shopify’s bin help.
You can also use the Bulk Editor to add the bin names to your inventory. Navigate to your Products > Inventory and use the checkboxes to select some items. You will now see the “bulk edit” button. Clicking on this allows you to add/update the bin details. You may need to add the column if you don’t see it in your bulk editor. You can do this using the “columns” button on this page. Once you add this column, you can enter or edit the bin values directly on the page. If you're not familiar with the Shopify Bulk Editor, it's sort of like using Excel or Google Sheets. Once bin names are entered, they become part of the product’s record in Shopify.
Creating and Printing Pick Lists
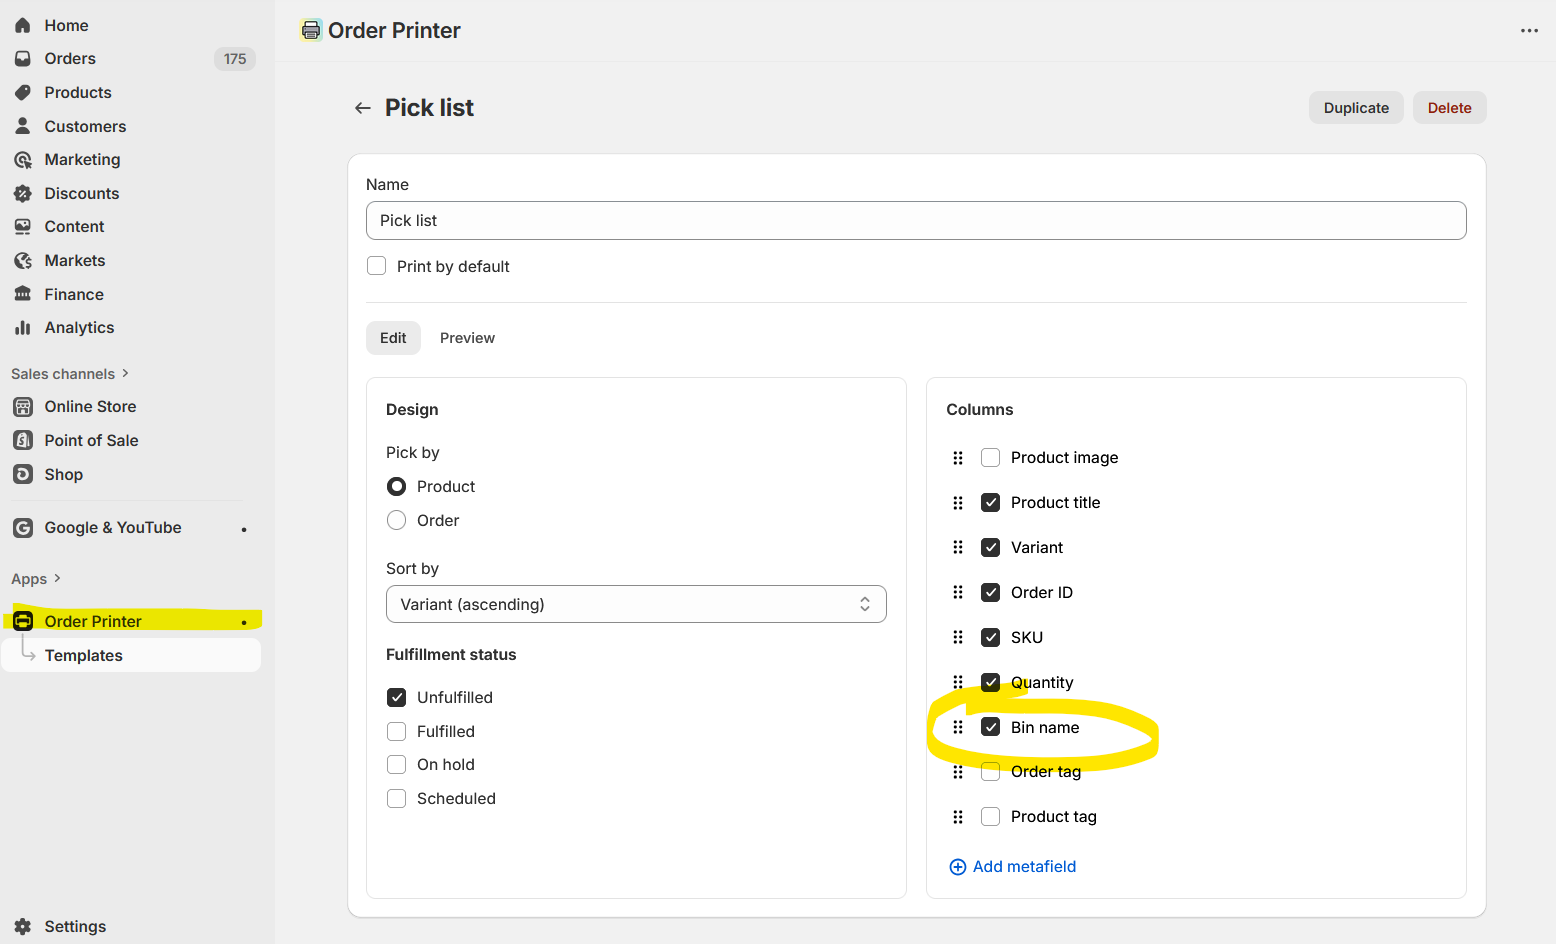
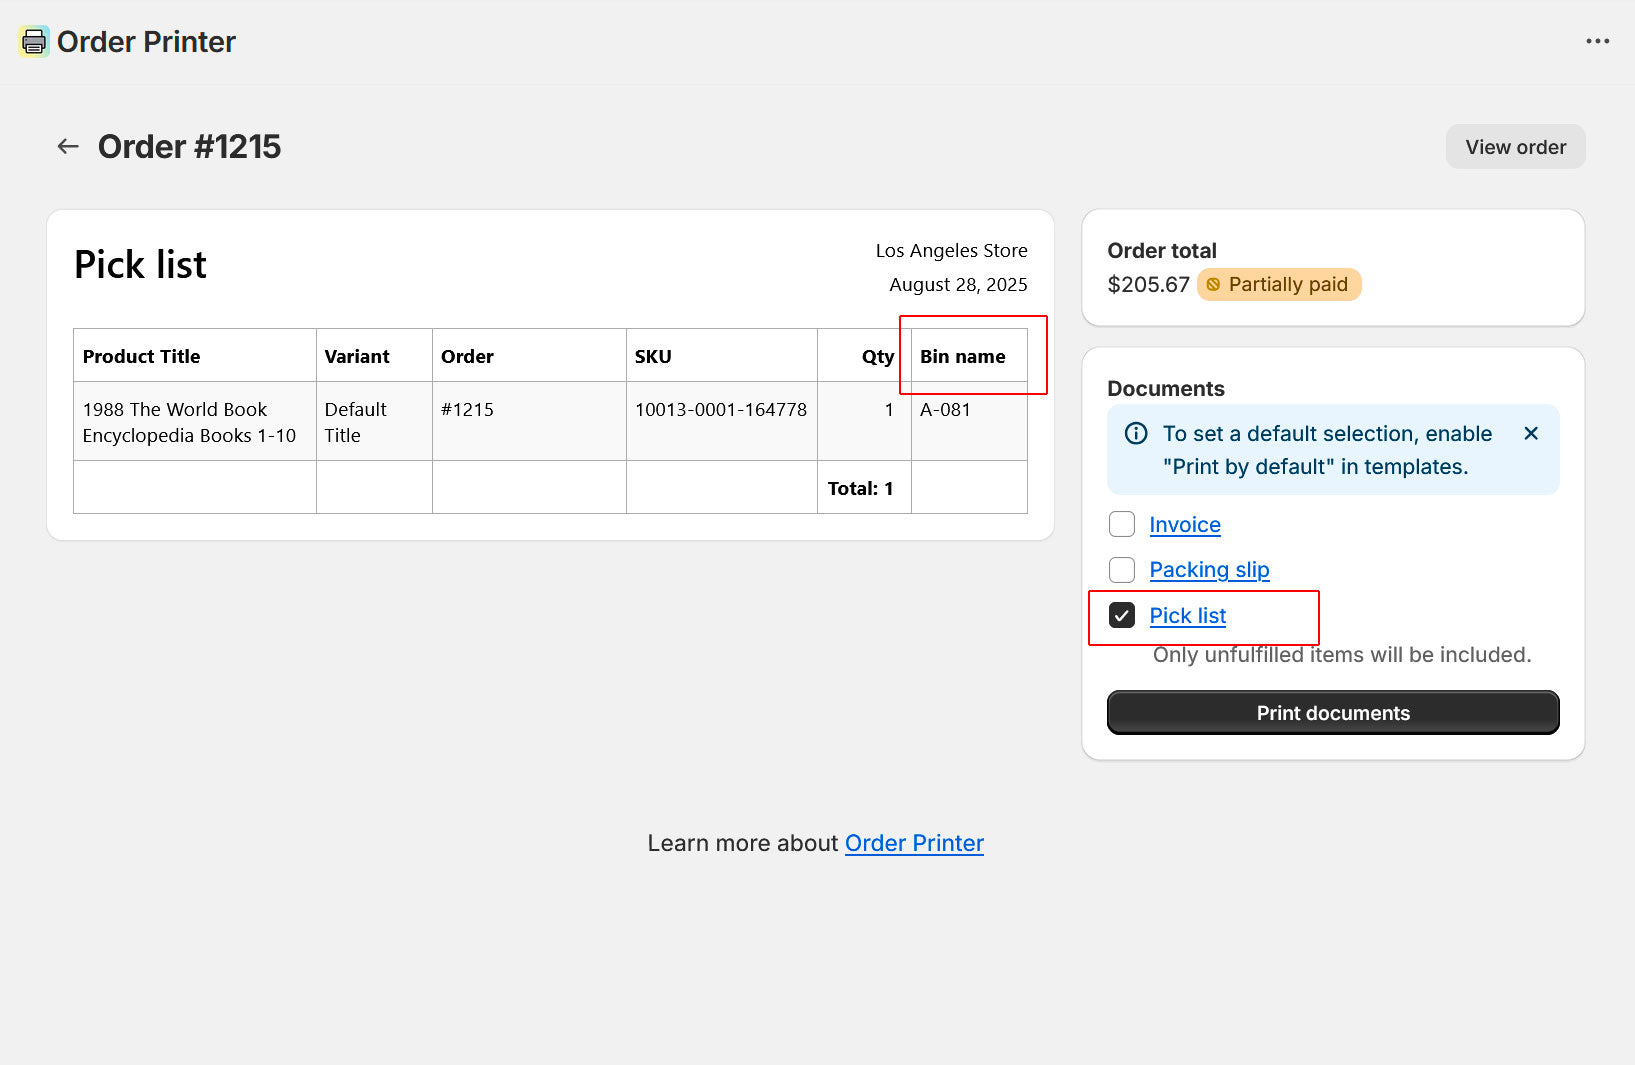
To take full advantage of these newly entered bin locations, you will use this data within the Shopify Order Printer app. This app will help you create the Pick List template and print customized pick lists for every order. This gives your warehouse staff a physical sheet with the exact bin locations to use as part of their picking and packing process.
If you don’t see the Order Printer app in your Shopify Admin, you can install it from the Shopify App Store. Once it’s added to your store, you can create various templates for your printed documents, including the pick lists. Order Printer gives you access to the bin name field in the template. When you design your template, you can include the bin field next to each product line. You can customize the pick list with any detail from the order.
(You can see the new “Bin name” column in the Order Printer app below)
How Easy is It to Use?
The addition of bin locations in Shopify is a great step forward for your warehouse, however the setting it up does come with some challenges. It relies heavily on CSV importing/exporting or manipulating the Bulk Editor tool. If you’re a merchant who doesn’t feel comfortable working with spreadsheets, then you may feel a bit intimidated. One wrong edit in the CSV could lead to frustration or confusion when the file is uploaded back into Shopify. We suggest being careful if this is the first time you’re using the CSV features in Shopify. You may need some Shopify training to learn how to use CSV files. If you’re already comfortable with handling data in spreadsheets, this process should feel pretty easy. You can quickly add or update values for bulk product updates. We like the power of this method since it’s likely you have a big list of products and manually editing one-by-one could be a slow process.
One small limitation is the display of bin information inside Shopify. At the moment, bin names don’t show up directly on the product admin pages themselves. Instead, they can only be viewed from the inventory management screen. This design choice makes it harder for merchants to quickly reference bin locations. Most merchants expect the product admin to display the complete information, so the lack of this data is confusing at first. For someone just getting started, this lack of visibility isn’t intuitive.
Getting started with this new bin feature takes a bit of patience, some spreadsheet skills and an understanding of Shopify’s inventory system. Once you get the hang of it, you’ll really love the organization it provides. Hopefully, Shopify continues to refine this functionality to make it easier to use. Even with the learning curve, having native bin locations in Shopify is a big step forward for warehouse efficiency.
Looking ahead, there’s still room for Shopify to refine and improve this feature. Ideally, bin data should be easier to manage directly in the admin without requiring CSV imports and exports. It would also be helpful to surface bin values more prominently on the product pages themselves. Merchants shouldn’t have to jump back and forth between different sections to get complete product information. These small adjustments would make the feature much more accessible to everyone.
Even with these current limitations, the fact that Shopify supports native bin locations is a major step forward for warehouse efficiency. It shows that Shopify recognizes the importance of inventory organization at scale and is moving toward giving merchants more control over their warehouses operations. If you’re willing to invest the time, bins will quickly become a cornerstone of your fulfillment process.
